Showing posts with label crafts. Show all posts

Monday, October 18, 2010

Great Holiday and Christmas Magazine: BHG Holiday Crafts 2010 A+++


I picked up this magazine a few days ago at our local grocery store. Better Homes and Gardens published the 2010 Holiday Crafts issue for $5.99. It is filled with some great Christmas ideas and gifts for the entire year. There are many “re-use” patterns and crafts. I think this is one my favorite magazines of all time. I scanned a few of their "completed" items to show you that this is a great inspiration generator. Next time you are at the store you should thumb through it. Have a great week.

The First Doll in my 7 Deadly Sins Collection


I have had an idea for quite some time to create various one-of-a-kind clay dolls and decided that I would start with the 7 Deadly sins. So using nothing but Polymer clay and marbles, Gluttony was born. I baked him for over an hour at 275 degrees and let him cool down. I used a craft chalk to enhance the creases in the skin. I will be adding a leaf crown to his head along with some accessories like a wine glass and other things. Stay tuned…

Tuesday, July 27, 2010

How to Make Skittles- Not the Candy but the Craft (Hot Trend)


Directions come from a dear Message board friend named AnnaE. I tried her "recipe" and it all turned out.

With the skittles if you have a hard time finding a certain color you can color the clear ones yourself with alcohol inks. It's pretty simple:

get a small plastic zip lock bag

put in the amount of skittles you want to color

put 2-3 drops of the ink in the bag

seal and squish around to color

if they are not dark enough add another drop

add one drop at a time until it is the color you want

pour out on wax paper

let dry, about 5 minutes

put in a new plastic bag, label


I put the name of the color on the old plastic bag and reuse, I like to recycle. 

Twilight Shoebox Swap (My Finished Projects)

So, I was involved in, yet another, Twilight Eclipse Shoebox swap and I had 2 partners. I had a fun time creating these boxes. I even taught myself how to make "skittles"***(see note). I wanted to share with you the boxes I created and hopefully my partners won't sneak a peek, :) hehe.

Sunday, June 27, 2010

Edible Art, Bella Twilight Apple Decor


I recently bought an engraving dremel and wasn't sure how to use it. I played around with it a bit and that afternoon went to the craft store and found these fake looking apples. So, I wrote out the words/lettering with a ball point pen and etched the words: Edible Art, Bella?- Edward Cullen on it. This looks great in my art studio and adds some much needed Twilight Whimsy.

Tuesday, April 13, 2010

“A Stitch in Time Saves Nine” A Lesson on Needlework

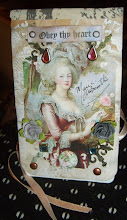
         M’Lady’s Chateau Counted Cross Stitch Gold Design Pattern


   Growing up, I often heard the phrase “A Stitch in Time Saves Nine.” At that time, I did not fully realize the importance of that saying. Coming from a family who often created works of art from things found, mediums bought, fabric woven and made, yarn and wool spun to create wonderful items. My mother was the first person to introduce me to my first sewing kit and I have it to this day. This treasured box was covered in a floral blue pattern, and had needles, thread, a pin cushion, scissors, fabric pencil, thimble, buttons and other sewing notions. My mom and Grandmother then took on the task to patiently teach me the art of sewing, candle wicking, and eventually cross stitching. I can always remember my grandmother having a crochet needle and yarn in hand almost every time I visited her. She would borrow my treasured “Strawberry Shortcake” dolls and crochet dolls about a foot high. I know that I have these lurking amongst my childhood treasures. She created afghans for each of her grandchildren and eventually created little baby bonnets and baby blankets for her great-grandchildren. I tried to get her how to show me how to crochet, and I was taught how to make a chain out of yarn. But, that was as far as it ever got. Time did not permit her to teach me further steps. I have since forgotten to make the chain, and do my candle wicking.


   Knowing that I wanted to do some sort of needlework, I took off with the beloved and relaxing counted cross stitch. I started making the tiny ornament kits one can buy at most hobby stores. Soon, I graduated into larger and grander projects. When I had my first son, I created a Noah’s Ark Birth Sampler, and continued making further samplers for my other two sons. So, where are we today? I was once told that you know you are a true and great needle worker; the back of your project needs to look almost as nice as the front of the piece. This meant that I did not do a color line and then go back to create the final “X”, each square was completed before I could move on. If there were 5 squares of one color and the next in a following color, I would stitch the 5, slide the needle back through the stitches and then cut it. There are no knots in my work, as I have learned that is another sign of a genuine enthusiast. I am not downplaying anyone else’s style or work that is just the way I learned.


   About 8 years ago, I purchased a Gold Collection Kit titled “M’Lady’s Chateau” which was a design based on a real oil painting from centuries past. This is still a work in progress, and I hope to finish it sometime soon. I have dedicated over 300 hours to this project, and I know I have many hundreds left, but for the mean time, I wanted to share with you the beautiful things one can created from a little thread, needles, and fabric. I challenge you to create a needlework that you can pass on to your family, an heirloom to be treasured forever.


   When going to tag sales, or second hand stores, I often see needlework pictures marked for pennies, and it saddens me for several reasons: the person who created this project made it out of love, countless hours, and perhaps with the desire that it would remain with the recipient and then down the family line. Next time, you see one of these projects or someone gives it to you and it may not be your style, please don’t just disregard it. Many needlework pictures and fabric can be reworked into fancy chair seats, pillows, or tapestries. If none of those ideas appeals to you, donate it to a local needlework guild or textile museum. Doing this small act, will help us remember the times, and our own history. Years from now, the long lost descendent may stumble across their great aunts art work and be able to treasure it and know that someone cared enough to save it from landfills or hidden in boxes never to be seen or heard from again.

“Celebrate” A Child’s Birthday Scrapbooking Page


   I was in a recent Birthday Border Swap on the Cricut Message boards. The rules were simple and were to create 5 kits for the swap we were in and we would receive 5 back. The three categories were: Boy’s Birthday, Girl’s Birthday and a Birthday kit for anyone. I chose a spot in three. What we were to create was a layered 2”x12” border, 2 layered photo mats, and add a few birthday embellishments (we were not to include the 12”x12” paper so that we could use our own). I got my box of goodies a few weeks ago, and last night dug it out. So far, I have created 6 layouts. Using the “Page Candy,” I went to work and used the items in each kit. I added my own personal touches such as brads, stickers and other embellishments on other pages. I love the colors used on the “Celebrate” page and the “page candy” for a girl used was from: CarrieCameron. The elements I used from her kit, included: the pink and blue photo mats, and the long 12”x12” layered border with the 3 adhesive bling on either sides, and the word “Celebrate”(which I used a little Clearsnap Cat’s Eye Ink Distressing Chalk on the word and on the edges of the mats and borders). I embellished the page using craft foam for dimension, a light blue and white paper, added layered embellished stickers which included the Happy Birthday sticker placed in the top center of the page, 2 little cupcakes with pink bling, a tipping cake sticker, 2 party hats on either side of the word “Celebrate”, and placed 6 glittery stars on various places on the Celebrate word. I love the simplicity of this page. When I add my pictures, I will be adding photo corners to hold the picture into place. For now, my page is complete.

Thursday, March 25, 2010

Little Girl's Pink Ballerina Dress Card and Scrapbooking Embellishment

       
       One day I was needing a ballerina embellishment to add some depth to a scrapbook page I was making. I searched endlessly through my Cricut Cartridge Collection, and nothing extraordinary appeared. So, I started to trace a pattern onto some cardboard and made my own dress. I used a heavy duty pink cardstock for the base of the dress and some frosted vellum to create a mesh sort of skirt. I distressed the edges of the little dress. When I made the small little V belt, I added a small flower and on others these little beady things that us crafters call: Skittles. I further enhanced it with a little strand of connected pearls that are normally found down the Wedding Aisle at stores. I used glue dots to piece everything together. I found the perfect quote and printed it out and used foam to  lift the quote from the cardstock that it was on. My page was complete and I truly enjoyed making the first one so I ended up making another 20 all hand cut and home-made. This would surely brighten any girls page, or to add to a card.

Thursday, February 4, 2010

Twilight Cullen Crest Book Cover


For the Twilight Swap that I am in, I wanted to create unique items for my partner and she also likes the Cullen Family. I messed around with my photo/ Design imaging software to try and replicate the Cullen Family Crest. I apologize for the glare on the cover. I used the DCWV 12"x12" stack with the leather looking paper and cut it to the size of the book cover. Then, I applied modge podge on the plastic cover and then placed my Cullen Crest Design on it. Another layer of modge podge and sealer was applied. I plan on adding one more coat just to be safe. Inside this book I will include recipes, Twilight Trivia, Ideas for Twilight Parties, the Twinchies, and many other things. I am in the process of making a checker board with Twilight related cameos and squares that match the Twilight colors. Enjoy!

Wednesday, February 3, 2010

Disney Valentine Gift Baskets and Items for Teachers


Valentine’s Gift Ideas for Teacher, Friends, Neighbors and Everyone who is Important in Your Life

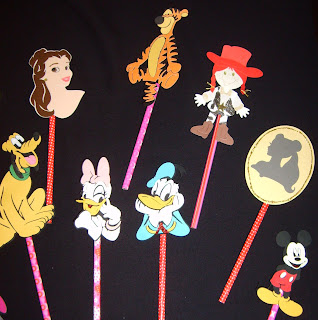
Each year, we are given a day to express our love, devotion, and care for those who mean something to us and create something unique to them. I enjoy the challenge of creating a sort of artsy craft for teacher, my kid’s friends, and neighbors just to name a few. A few years ago, I made Disney Valentine Bags (the picture is posted on the left hand side of the screen) for my sons and they were a big hit! This year I was feeling a little ambitious and have been very busy trying to create something special for those who teach our children, something besides the obvious.
I bought several bags of mixed candies, Valentine’s paper, Ribbon, Heart shaped baskets, and heart shaped boxes of chocolate, pencils and other items. I individually wrapped most of the items for each gift basket. I needed to make 4 and wanted a little variation given to each teacher.
I took Valentine’s paper and wrapped miniature candy boxes/bags, the Valentine Heart, Magnets that were attached by a pencil and could be easily taken off so the teacher could use the magnet as well as the pencil well after Valentine’s. I took a ton of pictures to give you ideas and to spark just a little creativity to those who care so much for others. It is amazing what you can do with paper, tape, labels, candy….I found a great teacher poem and printed it off and attached them to heavy cardstock; this can also be used as a magnet. I created little sayings that would mean something to those teachers. I asked my kids to ask their teachers what sort of Disney characters they liked, and I got to work using my Cricut Expression cutting machine. I am still working on assembling the baskets and will post within the next few days. These were really time consuming and so far I am really pleased with the items I have made…