Hello Dear Friends,I figured it was time to jot down some thoughts and ideas for personal reasons and to just "Put it out there." Sure the list makes me vulnerable but then it shows people that I do have reasons for doing things. If you haven't already watched the movie "The Bucket List" I highly recommend it. The premise is these 2 guys meet who do not have a long time to live and so one of the guys writes a list down on a normal piece of paper of things he'd like to do before he "kicks the bucket." The other guy finds his list and starts adding to it and says "We can do this. We have just months the doctor says, we can go out with our guns blazing...." Or at least something like that. Over the years, I have created all sorts of "bucket lists." Sure, I did not call it that but, they were lists that I created and shared with some of my closest friends and family. It made me accountable. When I was in my twenties (32 now) I had the dream of getting my first book published by age 30, and shared that dream and goal with another fellow author. Well, that dream was accomplished at age 28 (3 years before my 5 year deadline). Setting these goals and perhaps posting or sharing them holds us accountable. Life is so short and precious. My list consists of some family goals and things to do within the next few years, but it mainly deals with my own dreams and goals. I know that if I accomplish them, it will not only help me but everyone that comes into my life.
A few years ago, I was flipping channels and stopped on the Oprah show to watch this guy (didn't know his name at the time) who turned out to be a professor at Carnegie Melon University named Randy Pausch and he was giving his "Last Lecture." The last lecture is something that is often asked of teachers, professionals, and others to give either at the end of a school year, retirement and other things about things you may have done better, wish you may have accomplished etc. Turns out when Randy Pausch was giving his "last lecture" someone recorded his lecture and posted it on Youtube. I will let you watch it, because it will inspire you. He wrote a book about his last lecture and it is one everyone should read at least once, or perhaps give to a student getting ready to graduate. These are the movies and people that will change your life.
If you haven't sat down recently to write what you may want to do with your precious life or perhaps how you may want to be remembered, I ask that you challenge yourself and do it. Life goals are important to have and give your life meaning. I may or may not post my own bucket list, but wanted to at least get you started on one, perhaps it may to smile at a stranger today or say hello. All it takes is one step to change your life and the lives of others around you. One more "Youtube" moment, I was looking for inspirational videos and actually typed those words in and came across the following video, and it was remarkable. I hope you find it as inspirational as I did. So, my question to you today is, do you have a bucket list?
Tuesday, April 27, 2010
Monday, April 26, 2010
The Start of the School Fundraising Mickey Stand Cut-Out & Give-A-Way Announcement


Well, we needed a Mickey Mouse stand up so that we could have chidren get pictures taken with Mickey and have them framed as a souvenir. He was cut with a skill saw and stands over 5 feet tall. My cricut has been also working over time with so many cut-outs (3 deep cut blades, 1 regular cut blade, 2- 6"x12" Cricut cutting mats, 1-12"x12" mat, and 1- 12"x24" cutting mat). But, it is s worth it.So far, Mickey is cut and primed, and just drying and getting ready for his "make-over." I created a Tinker Bell Wood Cut out but she turned out smaller than I wanted but perhaps we will find a use for her.
With the blessings of my beloved Cricut Cutting Machine, I will be doing a Giveaway/Entry, just follow the directions and I look forward to blessing the winner. I decided to take a picture of the 3 items one person will win: 1 package of Brand New In Package Cricut Color Ink Cartridges Primary Color, Mood Label Stickers, and a package of Travel-Related Stickers. (I am sorry but I can only ship within the USA). I will use a random counter to make it fair. There are just way too many talented people for one person to judge. Thank you all for being loyal "followers" aka friends.

Thursday, April 22, 2010
Earth Day 2010 "Wasted" Altered Art Display Show Exhibit Entries
I did it!

I entered my first art show which was labeled as the 12th Annual Waste Transformation Art Exhibition sponsored by the Clay County Environmental Program, and Moorhead Library. I entered 21 items and found out today that I placed 3rd in the Adult category. When I got to my Display, I noticed one of the items was upside down and so I had to contact one of the coordinators to unlock the cabinet and place it correctly. To name a few items entered was an altered game piece Whitman Candy box, an old picnic basket, and equal box converted into a candy holder, cookie cutter & scrap wood turned into a child's pull toy, and many others. It was interesting standing back and listening to people ohhh and ahhhh at my things. I was shocked to find that 19 of the 21 items were the only items in the entire exhibit to be displayed in a locked glass cabinet.


My Own "Disney Tree of Life" Altered Art Collage and Art Show Entry

My children and I are avid Disney fans and I wanted to create something special for them to learn from and have as a keepsake. I entered this into the Hawley Art Show and Sale 2010. I will know on Sunday what place it takes in the show as well as my other entries. I used my Cricut Cutting machine and the following Cricut Cartridges: Animal Kingdom, Zooballoo, Disney's Mickey and Friends, Disney's Mickey Font. My children enjoy trying to discover and count all of the animals and Mickey heads on the collage.


Dreams Come True Disney Carnival Art Display

Knowing that I am a part of something that will change and inspire the youth of today, I created a "Dreams Come True Disney Carnival Art Display." I used my Cricut Expression and several cuts from my Disney Princess Cartridge Collection. The display is over 3 feet wide and 2 feet tall. It is shaped like an aquarium and the sides are hinged onto the main "aquarium"shape.


The children who have seen this so far have tried to claim my display, but I let them know that they would see it again next week at the school carnival. I am going to donate this display to be used for future events, and hopefully inspire others to create their own versions of art and explore creativity.
Close-ups of the middle display:


Life through My Eyes
.jpg)
It is truly amazing what comes before our eyes and we often forget to remember those little moments that create the real Ah-ha moments. Today was a special day for my family and I as two of my sons and I attended “our” first Art Show that had “our” artwork which took place in Hawley, MN.

people stopped and talked to them about their artwork.


Monday, April 19, 2010
All Things Disney Inspired Slideshow

All Things Disney Slideshow
Wednesday, April 14, 2010
Cupcake Birthday Card

Cupcakes are so adorable and with many birthdays fast approaching in my family, I decided to make a cupcake birthday card for my niece. I used the Wildcard Cricut Cartridge and Cutting machine, stickles, brads, lace and cardstock to create this little card. The glitter mat stack was wonderful to use as the "icing" on the cupcake and gave it a sparkly and yummy look.
Tuesday, April 13, 2010
Congrats Xavier! Hunter & Gun Safety Celebration Cake

Last night, my oldest son passed his Hunter and Gun Safety Course with flying colors. Today, I decided to surprise him with a cake. I do just basic cakes, frosting, sprinkles and whatever else I have on hand. I decided to dig out my Cricut Cutting Machine and "A Child's Year" and "Cuttin' Up" and "Animal Kingdom" cartridges and make some paper embellishments for the cake to "dress it up" a little. I cut out some moose, deer, raccoon, duck, and a few other animals. I cut out a little pilgrim boy with a gun and layered it. Then I took some thin wooden skewers to attach to the back of the boy, the trees and one deer. I cut a green award pin that I glued the letters "O,N,A" on it. I cut out the words: Congrats Xavier. I used green crystal sugar to create a grassy look. Even though, I am not an advance cake maker, I wanted to share my joy with everyone. I am so proud of my little guy! They grow up so fast. I took various angle pictures to show close ups.


"One Inch at a Time" Altered Inchie Art Collage

I was in a recent pink and brown/pink and black "inchie" swap, and ended up with all sorts of little pieces of art. Not really sure how or where to use them, I decided to make a collage of the pieces and then frame them. I matted it with silver cardstock. Picture ended up being 10"x13."
“A Stitch in Time Saves Nine” A Lesson on Needlework
M’Lady’s Chateau Counted Cross Stitch Gold Design Pattern

Growing up, I often heard the phrase “A Stitch in Time Saves Nine.” At that time, I did not fully realize the importance of that saying. Coming from a family who often created works of art from things found, mediums bought, fabric woven and made, yarn and wool spun to create wonderful items. My mother was the first person to introduce me to my first sewing kit and I have it to this day. This treasured box was covered in a floral blue pattern, and had needles, thread, a pin cushion, scissors, fabric pencil, thimble, buttons and other sewing notions. My mom and Grandmother then took on the task to patiently teach me the art of sewing, candle wicking, and eventually cross stitching. I can always remember my grandmother having a crochet needle and yarn in hand almost every time I visited her. She would borrow my treasured “Strawberry Shortcake” dolls and crochet dolls about a foot high. I know that I have these lurking amongst my childhood treasures. She created afghans for each of her grandchildren and eventually created little baby bonnets and baby blankets for her great-grandchildren. I tried to get her how to show me how to crochet, and I was taught how to make a chain out of yarn. But, that was as far as it ever got. Time did not permit her to teach me further steps. I have since forgotten to make the chain, and do my candle wicking.

Knowing that I wanted to do some sort of needlework, I took off with the beloved and relaxing counted cross stitch. I started making the tiny ornament kits one can buy at most hobby stores. Soon, I graduated into larger and grander projects. When I had my first son, I created a Noah’s Ark Birth Sampler, and continued making further samplers for my other two sons. So, where are we today? I was once told that you know you are a true and great needle worker; the back of your project needs to look almost as nice as the front of the piece. This meant that I did not do a color line and then go back to create the final “X”, each square was completed before I could move on. If there were 5 squares of one color and the next in a following color, I would stitch the 5, slide the needle back through the stitches and then cut it. There are no knots in my work, as I have learned that is another sign of a genuine enthusiast. I am not downplaying anyone else’s style or work that is just the way I learned.

About 8 years ago, I purchased a Gold Collection Kit titled “M’Lady’s Chateau” which was a design based on a real oil painting from centuries past. This is still a work in progress, and I hope to finish it sometime soon. I have dedicated over 300 hours to this project, and I know I have many hundreds left, but for the mean time, I wanted to share with you the beautiful things one can created from a little thread, needles, and fabric. I challenge you to create a needlework that you can pass on to your family, an heirloom to be treasured forever.

When going to tag sales, or second hand stores, I often see needlework pictures marked for pennies, and it saddens me for several reasons: the person who created this project made it out of love, countless hours, and perhaps with the desire that it would remain with the recipient and then down the family line. Next time, you see one of these projects or someone gives it to you and it may not be your style, please don’t just disregard it. Many needlework pictures and fabric can be reworked into fancy chair seats, pillows, or tapestries. If none of those ideas appeals to you, donate it to a local needlework guild or textile museum. Doing this small act, will help us remember the times, and our own history. Years from now, the long lost descendent may stumble across their great aunts art work and be able to treasure it and know that someone cared enough to save it from landfills or hidden in boxes never to be seen or heard from again.
“Contemporary Girl’s” Happy Birthday Two Page Scrapbook Layout

I was in a recent Birthday Border Swap on the Cricut Message boards. The rules were simple and were to create 5 kits for the swap we were in and we would receive 5 back. The three categories were: Boy’s Birthday, Girl’s Birthday and a Birthday kit for anyone. I chose a spot in three. What we were to create was a layered 2”x12” border, 2 layered photo mats, and add a few birthday embellishments (we were not to include the 12”x12” paper so that we could use our own). I got my box of goodies a few weeks ago, and last night dug it out. So far, I have created 6 layouts. Using the “Page Candy,” I went to work and used the items in each kit. I added my own personal touches such as brads, stickers and other embellishments on other pages. The creator of what I call the “Contemporary Girl” page elements was: Scrappin_RN. The only “add-on’s” I used was on page 2 which was a little candle above the layered cake and a Happy Birthday Sticker on the turquoise/green flower. I did use some craft foam to add dimension to the elements. I used a solid black piece of cardstock and a white and blue heavy cardstock from the DCWV Old World Paper Stack. I love the simplicity of this page. When I add my pictures, I will be adding photo corners and most likely a journal box, but until now, my pages are complete.


“Celebrate” A Child’s Birthday Scrapbooking Page

I was in a recent Birthday Border Swap on the Cricut Message boards. The rules were simple and were to create 5 kits for the swap we were in and we would receive 5 back. The three categories were: Boy’s Birthday, Girl’s Birthday and a Birthday kit for anyone. I chose a spot in three. What we were to create was a layered 2”x12” border, 2 layered photo mats, and add a few birthday embellishments (we were not to include the 12”x12” paper so that we could use our own). I got my box of goodies a few weeks ago, and last night dug it out. So far, I have created 6 layouts. Using the “Page Candy,” I went to work and used the items in each kit. I added my own personal touches such as brads, stickers and other embellishments on other pages. I love the colors used on the “Celebrate” page and the “page candy” for a girl used was from: CarrieCameron. The elements I used from her kit, included: the pink and blue photo mats, and the long 12”x12” layered border with the 3 adhesive bling on either sides, and the word “Celebrate”(which I used a little Clearsnap Cat’s Eye Ink Distressing Chalk on the word and on the edges of the mats and borders). I embellished the page using craft foam for dimension, a light blue and white paper, added layered embellished stickers which included the Happy Birthday sticker placed in the top center of the page, 2 little cupcakes with pink bling, a tipping cake sticker, 2 party hats on either side of the word “Celebrate”, and placed 6 glittery stars on various places on the Celebrate word. I love the simplicity of this page. When I add my pictures, I will be adding photo corners to hold the picture into place. For now, my page is complete.
“Delicate Victorian Birthday Girl” Scrapbook Page
"Delicate Victorian Birthday Girl" Scrapbook Page Layout

.JPG)
Tip: If you see a paper or embellishment that you love, buy it. There is no guarantee that the pattern will continue and you will be left without.
This page was created by me for a Birthday Swap I was in where I was to make elements for a 12”x12” Girl’s Birthday. I decided to create a very girly and delicate, feminine page. This page took me 3 hours to create and design and included photo mats, journal boxes, embellishments, bling, craft foam, and other items to bring life to the page. I have included a journal box that has the little dress placed in the center, when you open the holder up a little pink bird greets you. I used 2 inch wide pink and white gingham ribbon as a page border. Red chenille fibers were used to create the balloon strings. I used my Cricut cutting machine to cut the little dress, Birthday Girl Embellishment, balloons, and a silhouette of a little girl blowing out a candle. I used the following Cricut Cartridges: Happiliy Ever After, and A Child's Year. The paper was used from a large paper assortment.
.JPG)
.JPG)
The Delicate Victorian Birthday Girl Scrapbook page is my own design, and if you choose to print it out, copy, or use it, please give credit where credit is due. If you plan on publishing my designs on your blog, books or articles, please contact me for written permission as I own the copyright.
Sunday, April 11, 2010
“All That I Am” Embellished Mother’s Day Card Friday Challenge

Knowing that Mother’s Day is fast approaching, I knew that I needed to get, make or buy a Mother’s Day card for my beloved Mother. Each year, I stroll down countless aisles of “generic” or “mass-produced” cards to try and find the “right words” that describe my undying and grateful love for my mother. This year I decided that I would make my mother a card that said what I wanted it to say and have her and I weaved and created throughout my card. First, I was stumped on where to begin. My mind had been in a fog for quite some time. Then and idea came to mind and I decided to check out a new blogging website that I have grown quite fond of: Practical Scrappers. There I found a wonderful “Friday Challenge” for the week of April 9, 2010, where one of the Practical Scrappers design team members, Gloria, created a pattern or example to follow.
To find her challenge, click on the following link below.
Practical Scrappers Blog Website
So I dug out my paper, glues, brads, ribbon, charms, chipboard, images and many other embellishments. The front of the card has many layers to give it dimension and add interest to the eye. I love lace and doilies and added them to the front and in the inside of the card. I used bling around the “Happy Mother’s Day” sentiment. More bling in the form of adhesive Pearls were added to the upper right hand of the card. The ribbon lace has been run through a metal brad ribbon holder. I used the Clearsnap Cat’s Eye Chalk Ink throughout the entire card. I used a Martha Stewart Lace Border punch and Fiskars “Icing on the Cake” Embossed and Border Punch. To create the dragonflies, I used the Martha Stewart Dragonfly Punch. I altered a metal bottle cap and before I hammered the edges down, I added a pink diamond pattern paper, with the words “I love you” with a tiny bumble bee which is on the upper portion inside the card. I created my own sentiments for my mom. The sentiments on the upper portion reads: All that I am…; Because of you…

The sentiments in the lower half of the card read:
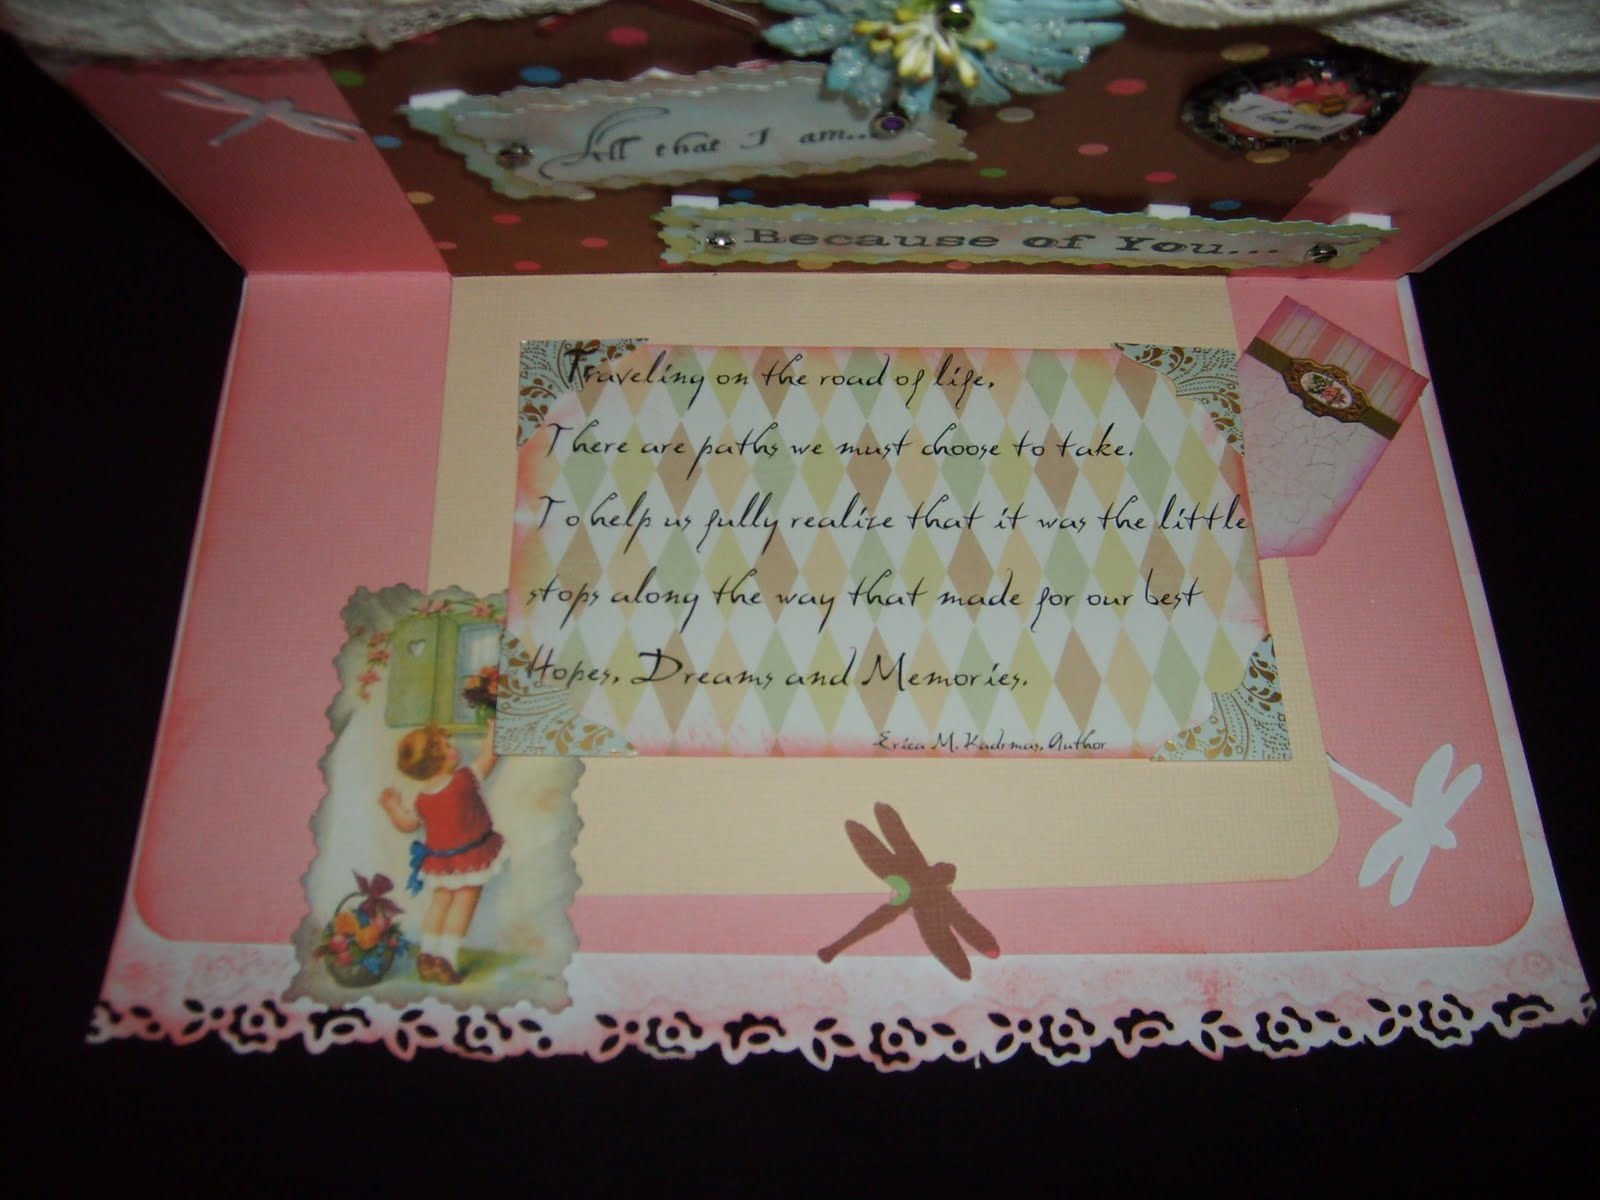
Traveling on the road of life,
There are paths we must choose to take,
To help us fully realize that it was the little
Stops along the way that made for our best
Hopes, Dreams and Memories.
I wanted the back of the card to be just as special as the rest of its counterparts and so used the dragonfly punch to make 3 dragonflies on the dark red paper. In between the dragonflies, I placed a vintage pink and white button between the spaces. I used a 7 gypsies Romantique label sticker and placed the word “Smile ” on it using double sided tape and mini black brads. I used mini white brads to further secure the label.

A few months ago, I picked up a stamp that I truly loved and it reads:
If you had any idea
How long it took me
To make this card, you
Would never throw it away.

To All Those Dear, Special and Wonderful Women in Our Lives:
Happy Mother's Day!
Friday, April 9, 2010
How to Make an Altered Fairy Gift Tag Instructions:

How the Fairy Tag was made:
- Chipboard
- 1 Peach Colored Piece of Cardstock
- Covered Adhesive Chipboard "F" Letter
- 4 inch Fairy Flower Stamp
- Paper Hole Puncher
- Ruler
- Glue Dots/Adhesive Double-Sided Tape
- Darice Finishing Accents Ribbon/Fibers
- Making Memories Metallic Charm that read: Laugh with 2 rows of 3 bling stones
- 3 Green Feathers
- 2 Prima Flowers- Daisy Mix #716387
- Le Plume Carnival Set Markers
- Crayola Thin Markers
- Clearsnap Cat's Eye Chalk Ink- Various Colors
- 2 Brass Brads
- 6 Pewter Square Brads
- Scissors
- Sharp Tool for Puncturing Holes into the Chipboard
2. Take your hole punch, and punch in the center of the tag.
3. Using the Cat's Eye Chalk Ink to distress the edges on front and back of the tag. I used 4 different colors to give it an aged "feel."
4. Take the wooden Flower Fairy Stamp (I bought mine from Michael's Craft Store), and take the Le Plume Black marker brush side to apply the ink and stamp onto a peach colored piece of cardstock. Let the ink dry.
6. Outline the colored design with the Le Plume Black Marker with the fine tip point.
7. Take the scissors and cut around the taller flower bunch that the Fairy is holding with her hands, and on the left side of image cut around the outer part of the butterfly and lower flower bundle until you reach the edge of the image. Measure the stamped image so that it fits the chipboard tag. Make sure there is no overhang of the image on the tag.
8. Take the purple fiber ribbon and measure enough of the ribbon to fit across the front of the tag, and allow about an inch on either side. Use mini glue dots to adhere the ribbon to the front of the stamped image. Turn the paper tag over and use a piece of tape to hold the remaining ribbon to firmly secure it into place.
9. Take the 3 feathers and tie the ends of each feather together with a piece of tape. Take another piece of tape to secure the feathers to the chipboard tag.
10. Take the stamped paper tag and put double sided tape around the entire perimeter of the tag, and a piece in the middle of the tag. Secure the tag to the chipboard. Note: There will be a little lift on the paper because of the feathers. This is alright because you will be "disguising" the lift with the Prima Flowers.
11. Using your sharp tool, puncture each corner, and above the cut butterfly image, and one near the little flower bunch on the left side (the 2 brads will be somewhat close) of the stamped chipboard tag making the hole wide enough to put brads through. Place a Pewter Square Brad in each hole.
12. Take the brass brads and insert it into the center of the prima flowers. Using your sharp tool, puncture a hole about 1/2 inch from the left side and place the larger prima flower with the brad into it and close it. Just a few centimeters below the first prima flower hole, place another hole so that you can put the second Prima brad flower.
12. Remove the paper on the back of the adhesive chipboard letter "F" and place it under the 2 flowers. I used the letter "F" for 2 reasons: Flowers, and Fairies.
13. Use a large raised Glue Dot and place it on the back of the metallic "Laugh" charm. Place the charm near the bottom in the middle of the chipboard tag. Your charm will cover some of the fiber, but that is what adds to the charm.
14. Take, at least, 2 different but complimentary ribbon and fibers and run it through and over to secure the ribbon to the tag. Tie the ends of the ribbon into a knot to prevent fraying.
15. Enjoy your new work of art! Place on a gift, or just hang it on the wall for a piece of art.
Subscribe to:
Posts (Atom)